
Copying an Appointment in GAP
There are three methods for copying an appointment in GAP:
Copy and Change Term - a shortcut for copying the exact same appointment to the same student for a different term
Copy and Change Student - a shortcut for copying the exact same appointment to a different student for the same term
Copy and Edit - a standard copy function with the ability to edit the student, term, awarded amounts, and cost objects
All three of these methods may be accessed from My Appointments, or from a Search/View by Appointment display, by clicking the More button at the beginning of the appointment line.
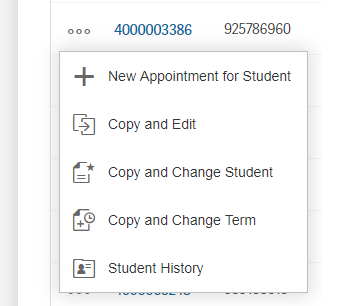
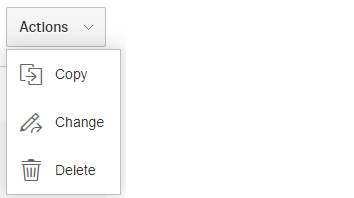
In addition, when viewing the details of an appointment, the Actions button in the upper right corner offers Copy, which is the full Copy and Edit function.
| Appointments that are still in Draft, or Pending Approval, cannot be copied. |
Copy and Change Term
- Locate the appointment you would like to copy, either from My Appointments, or from a Search/View by Appointment display.
- Click the More button at the beginning of the appointment line, and select Copy and Change Term. An overlay window appears.
- Select the new term year and period, and adjust the start and end dates if needed.
- Edit or add a message to student, and internal comments if desired. Note that the messages from the original appointment will be in these fields by default, but may be deleted or changed.
- Adjust any of the notification settings if needed.
- Click Submit when you have finished making edits.
| If you are copying an appointment that had fully awarded amounts for Tuition, Insurance, and/or Student Life Fee, these amounts may be adjusted to amounts appropriate for the term you are copying to, e.g. the spring vs fall insurance, or different Aid Year tuition values. This will not happen if the student was not fully funded for that amount. To make edits beyond this, you must use the Copy and Edit function. |
Copy and Change Student
- Locate the appointment you would like to copy, either from My Appointments, or from a Search/View by Appointment display.
- Click the More button at the beginning of the appointment line, and select Copy and Change Student. An overlay window appears.
- In the Select Student field, begin typing the students name or MIT ID to locate and select them from the dropdown list.
- Edit or add a message to student, and internal comments if desired. Note that the messages from the original appointment will be in these fields by default, but may be deleted or changed.
- Adjust any of the notification settings if needed.
- Click Submit when you have finished making edits.
Copy and Edit
- Locate the appointment you would like to copy, either from My Appointments, or from a Search/View by Appointment display.
- Click the More button at the beginning of the appointment line, and select Copy and Edit. (Alternatively, if you are viewing the details of the appointment, you can select Copy from the Actions button in the upper right corner.)
- A new, Create Appointment page will appear with all of the existing information from the appointment you selected to copy, including the term, student information, amounts and distribution details.
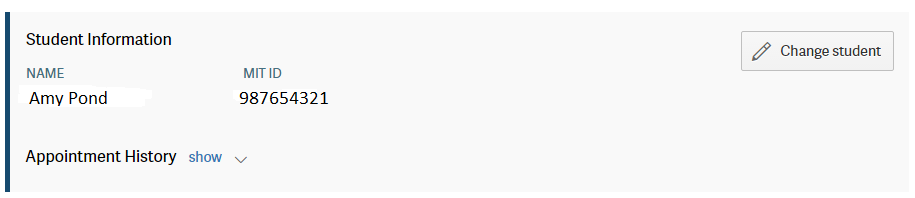
To copy this appointment for another student, click the Change Student button to the right of the student information.
This will open up a Select student field where you can enter the name or MIT ID of the new student. Once you select them, the Student information section will change to reflect the new student. All of the other appointment information on the page will remain. - Make any other changes required on this page, and then click Continue.

The Level of Effort will be copied from the original appointment and will NOT auto update, even if you have changed values, unless you select revert to calculated. - The advisor and notifications area will display. Any supervisor and advisors listed will apply to this student. Make adjustments as necessary, and add any messages to the student or internal notes. Click Continue to go to the Review & Submit page.
- Review to be sure your information is correct, and then click Submit at the bottom of the page. You will see a confirmation message that the appointment has been submitted.
Back to GAP Main Page